
The Program Settings page allows you to manage several global elements of the program
Display and Student Grouping Settings #
Da Capo Inventory allows you to group students into enrollment sub-groups. While a ‘Band’ teacher can see all band students in a building, it might be helpful if you could create a subgroup for just the Jazz Band, or just the Wind Ensemble – for the purposes of sending a group email or dealing with field trip information. Using this function, you can create student groupings. You can select which students are part of this group on the Enrollment Screen.
You will see the settings below on your “Program Settings” page or on the “Manage Enrollment –> Settings Cog” page.
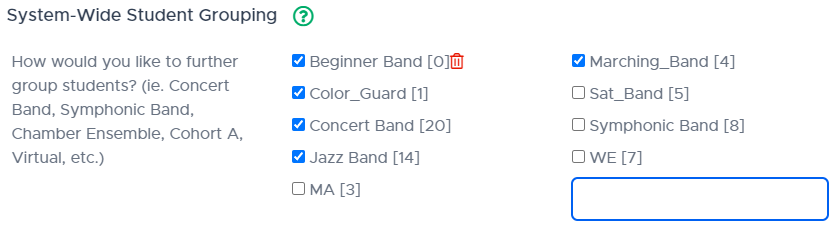
The image above shows you:
- All of the groups that are used throughout your school district
- How many students, district-wide, are enrolled in that subgrouping
- The blue check shows whether you are using that particular grouping or not in your profile
- The empty box at the end of the list allows you to create a new group that teachers in your district can use to group students
- If a group is unused, meaning that there are zero students enrolled in the group throughout your district, a teacher can delete that group by clicking the red delete icon beside the group.
Coming Soon (Fall, 2024):
- A quicker, intuitive way to assign student groups to students
Feature Selection #
As Da Capo Inventory continues to grow, normally based on great ideas from clients across the world, features are often added. When we add features, we offer existing clients the ability to turn on or turn off that functionality, so as not to clutter the clean interface of Da Capo Inventory. Using the On-Off toggle switches for each feature, you can show or hide certain functionality from Da Capo Inventory.
Email Settings #
A popular feature in Da Capo Inventory is the Family Communication (Email) function. Many pages throughout the program have a blue email icon beside the search box on the right side of the screen. You can choose to enter an ‘Email Signature’ here which will show up at the bottom of each email you send. JPG or PNG images can be included in the email signature (or the emails themselves). To add an image, click Insert –> Image –> Upload in the email editing interface on Da Capo Inventory.
Special Email Lists #
Teachers like to include additional personnel in email communications from time to time. If you have a ‘Band Staff’ email list or an ‘Administrator’ email list or a ‘Booster Email List’ that you would like to send CC emails to, you can create that list here and select that CC list when you compose an email to students.
- Enter the title of a special email list (ie. Boosters) and click out of the white text box. No Punctuation, please.
- Click the blue title of the new group you just added.
- Enter an email address and hit TAB or click out of the small text entry area. Enter more email addresses.
- Then, click Close. Your list will be saved.
Email Templates #
Six email templates are provided to all users upon account creation. You are free to use, delete, modify, or create additional templates.
To create a new template,
- Enter the title of your email template (This will be your subject line) and click out of the white text box. No Punctuation, please.
- Click the blue title of the template you just added.
- Type or Edit the template that you’d like to create.
- Then, click Close. Your email template will be saved.
To send an email from your list of templates, click any blue email icon throughout the program and notice the email template titles on the left side of the email popup. Simply click that email title, and the template will fill the text area.
Best Practices:
- On the Ensemble Attendance page, after taking attendance, Sort by ‘absent’ or ‘present’. Click the first absent student’s row. SHIFT-Click the last absent student’s row. Click the blue email button beside the search bar on the right side of the page. This email will be addressed only to the students that were highlighted. Click the “Missed Full Band Rehearsal” template title, and the email will automatically fill the text area. Edit if you choose, and click Send.
- If you use the rotating lesson feature, click the purple title of the lesson group from your Teacher Dashboard. This will set the destination of the email to each student in your group. You can use an email template just to email that group.
- On the Enrollment Page, you can SHIFT-Click large groups of students or CTRL-Click to select just a few. After you’ve selected your students, click the blue email button, and that email will only be sent to those few students.
Assistant Settings #
Da Capo Inventory takes student privacy laws (FERPA, NY Education Law 2d) very seriously. Student information can only be seen by the teacher of the student and the parent of the student (through the parent portal). While ‘Assistants’ can be created, they can only access functions that do not include student details, such as ‘Library’. When an assistant is created on this page, that individual will receive an email inviting them to set a password (just like you got when you became a subscriber). Once that individual logs in, they will see an interface similar to yours, with access only to the library in the buildings that you chose.
You can modify that person’s access, send them a password reset email, or delete that individual if you choose.