Skip to content
Da Capo Inventory Documentation

Streamlining Music Teacher's Offices

  • DCI Documentation
  • Encyclopedia
Da Capo Inventory Documentation

Streamlining Music Teacher's Offices

  • DCI Documentation
  • Encyclopedia
Popular Search deletetiernyssmarentalupload

Initial Setup

  • Da Capo Inventory Teacher Quick Start Guide
  • Clever SSO
  • Program Settings
  • Frequently Asked Questions including Delete
  • Two Factor Authentication (2FA)
  • Entire Site Search Feature
  • Set a Password for your new account
  • Log In to your new account
  • Set your User Preferences
  • Import Students 🎦
  • Import Instruments 🎦
  • Import Library Materials
  • Import Uniforms
  • Import Lockers
  • Switching Buildings

Inventory

  • Marking Instruments Obsolete 🎦
  • Inventory Update and Reports
  • LostInstrument.com
  • End of year
  • Assign Instruments, View and Edit Inventory & Print Contracts, Labels and Barcodes / QR Codes
  • Print Rental Contracts
  • Modify & View History of an Inventory Item
  • Repairs
  • Add Item
  • Physical Inventory
  • Barcode assign inventory
  • Find unused district inventory
  • Vendor Inventory

Enrollment

  • Student Rankings
  • Incoming Student Evaluations
  • Parent Portal Accounts (Teacher View)
  • Custom Student Fields in Da Capo Inventory
  • Student Practice Logs and Audio Recordings
  • Barcode Ensemble Attendance
  • Points Tracking System (Varsity Letters, etc.)
  • Student Evaluation System
  • Ensemble Attendance
  • Manage Enrollment, Email Families, Print Contracts
  • Modify Student Details
  • Save copies of student adjudication sheets
  • Program Enrollment
  • Add Student
  • Parent Portal

Financials & Trips

  • Rental / Maintenance Fee Reports
  • Add/Modify a Fundraiser
  • View Fundraising Accounts and Add Deposits
  • Withdraw money from the Ensemble General Fund
  • View or Download Complete Fundraising Ledger
  • Trip Setup
  • Manage Trips

Library

  • Da Capo Inventory Systemwide Library
  • Manage Building Library
  • Add/Modify a Library Item
  • Add a library item with a Barcode scanner
  • View District Library

Lesson Scheduling and Tracking

  • Manually moving a lesson date or time
  • Lesson Settings and a narrative for teachers
  • Lesson Groups
  • Lesson Days
  • Lesson Calendar Setup
  • Lesson Periods
  • Run Schedule and Print Cards
  • Record Lesson Attendance and Notes

Lockers

  • Create New Lockers
  • Assign Lockers
  • Exporting Lockers

Supplies

  • Add/Modify Supplies
  • Manage Supplies

Suggested Equipment

  • Suggested Equipment

Department Leader Documentation

  • 💰Da Capo Inventory Scholarship Program
  • Parent Portal Information Dissemination
  • Vendor Details
  • Rental Fee Reports
  • Parent Portal Accounts
  • Director of Music – District Overview
  • District Fixed Asset Inventory
  • District Inventory and Condition Report
  • End of Year Rollover for Directors
  • What to do after your account has become activated?
    • Dashboard Setup
    • Vendor Setup
    • Teacher Access Levels
    • Suggested Feature Rollout – Tiered Functions
  • District Wide Implementation
    • Staff Rollout
    • Process of Change
    • Prior to staff rollout & Equipment

State Festival Pre-Registration

  • Set your User Preferences
  • Parent Portal Information Dissemination
  • NYSSMA or other Adjudication Sheet Upload
  • Process Overview & Final Review
  • Parent Pre-Registraion
  • Teacher Review and Approval 🎦

Community Event Calendar

  • Community Event Calendar
  • Community Event Calendar Upload Instructions

Parent Portal

  • Starting out with the Parent Portal
  • What can a parent see and do on the portal?

Communication

  • Form Collection System
  • Da Capo Inventory Direct Messaging
  • Sending Emails to Family Members
  • Email Dashboard
View Categories
  • Home
  • Help Center
  • Inventory
  • Assign Instruments, View and Edit Inventory & Print Contracts, Labels and Barcodes / QR Codes

Assign Instruments, View and Edit Inventory & Print Contracts, Labels and Barcodes / QR Codes

View, Assign, Transfer, and Repair Inventory Items #

  1. Click ‘Inventory’ and then ‘Inventory’ again from the main menu.
  2. Here, you will see all of the instruments for the course-type(s) that you teach, along with an ‘Assign’ button and other ‘Actions’.
  • The Assign button will allow you to assign, or check out an instrument to a student. If students are missing from your list, please visit the Program Enrollment screen.
  • The three actions buttons will allow you to Edit the Inventory Item, Transfer Inventory Item to another building, and Send the Inventory Item to Repair.
  • Transferring Instruments can be achieved by clicking the middle action button above (the two blue left and right arrows). Only an unassigned instrument can be transferred too another building.
  • To return a transferred instrument, the teacher in the original building can do the following:
    • Click the purple icon in the Actions column to Edit the instrument
    • Choose to transfer the instrument back to your building
    • Click ‘Update Instrument’
  • District Leaders (Director of Music, Chairperson) can permanently transfer an instrument from one building to another using the ‘Modify Instrument’ button. This will update the permanent location of the inventory item.

Assigning Instruments #

There are three ways to assign, or check out instruments to students in Da Capo Inventory.

  1. The first way, and the way that I do it is: Go to Inventory, Search for Trumpet, Click ‘Condition’ so you get the best quality instruments on top, and assign instruments to your students. Using the inventory page, you can assign more than one student to an instrument by clicking the blue ‘plus’ button in the actions column.
  2. Another way to assign instruments to students is through the “Enrollment” page. Here, you can assign an instrument to a student by clicking the blue ‘Assign’ button – so long as the student does not already have an instrument assigned. You can also click the purple ‘Own’ button if the student owns their own instrument. You can record the serial number or other details about this Owned instrument on the Student Profile.
  3. If you are interested in checking out an instrument with the Barcode functionality of the program, you can print barcodes for inventory items (either 1D or 2D QR codes) from the inventory screen. You can print out barcodes for students on the Enrollment Screen. Then, by using the ‘Quick Assign’ feature, you can scan a student barcode – then an instrument barcode to assign instruments.

Print Barcodes for Inventory Items #

  1. In addition to the Search bar, you will see a Barcode Button near the top right . This will allow you to print out selected instrument barcodes starting with the next blank label on your sheet of labels.
  • To limit the labels that will be printed, simply type ‘Flute’ in the search field, and only Flute labels will be printed.
  • Or, select one or more rows from the table using the mouse and either your CTRL-key or your SHIFT-key. Then click the Bar Code button and inspect your labels before you print them. You can select the size of the labels you would like to print from the Settings cog. There are several different Avery style labels that you can change to as you print your inventory barcodes.

Change from Barcodes to QR Codes #

To switch from regular 1D barcodes to 2D barcodes (QR Codes), one setting has to be changed.

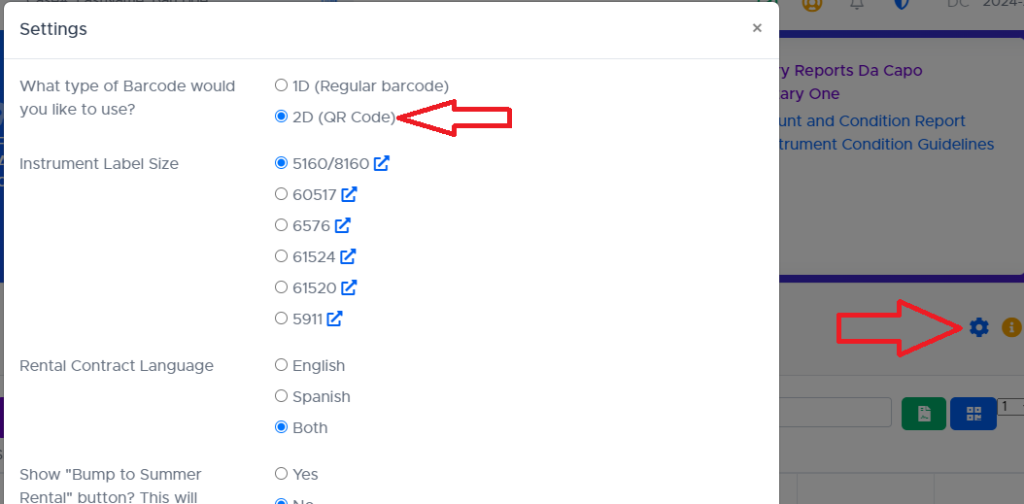
  1. Click the blue settings cog near the right side of the screen above the search bar
  2. Choose 2D (QR Code)
  3. Click “Update Settings” near the bottom of the popup window
  4. Click the QR Code button to the right of the search bar (beside the green Rental Contract button) to print QR codes for all instruments.
    OR, search for “Flute” or “Clarinet” to print QR codes for all Flutes or Clarinets – then click the blue QR code button
    Or, select (click) on an instrument to print 1 QR code – then click the blue QR code button
    OR, select several instruments (Shift-Click or Ctrl-Click) – then click the blue QR code button

Print Rental Contracts #

  1. After assigning instruments, you will be able to print Rental Contracts for your students by clicking the Green contract button in the actions column. Alternatively, you can click the larger Green contract button beside the search bar to create contracts for all students listed on your screen.
  2. The same functions can be found on the Enrollment screen.
Is this page helpful?
Still stuck? How can we help?

How can we help?

Updated on September 2, 2024
End of yearPrint Rental Contracts
Table of Contents
  • View, Assign, Transfer, and Repair Inventory Items
  • Assigning Instruments
  • Print Barcodes for Inventory Items
  • Change from Barcodes to QR Codes
  • Print Rental Contracts

Copyright © 2026 Da Capo Inventory Documentation | Powered by Astra WordPress Theme