
Groups allow you to organize students within your program into ensembles, classes, levels, or any other grouping that is useful to your program. For example, you might create groups such as 8th Grade Band, Jazz Band, Advanced, Beginner, or NYSSMA.
Students may belong to more than one group at the same time.
View Students in a Group #

At the top of the Manage Enrollment page, your groups appear as Subgroup Shortcuts.
Click a group name to display the students assigned to that group. You may select more than one group when you need to further narrow the student list.
Click All students to remove the group filter and display all students again.
You may also use the table’s search and filtering tools along with the subgroup shortcuts to create the exact list of students you need.
Show Group Information in the Student Table #
Click Groups under Table Columns to show group information in the student table.
This can be helpful when reviewing the groups assigned to individual students or when determining which students still belong to a particular group.
Manage Groups and Bulk Group Assignments #
Click the orange Settings button at the top of the Manage Enrollment page to open the group-management tools.

From Group Settings, you can create and manage groups and make group changes for many students at the same time.
The bulk group tools are especially useful when you need to:
- place an entire grade level into a group;
- populate a new ensemble or class;
- remove students from an old group;
- move students from one group to another; or
- empty a group before deleting it.
Mass Update Groups #
The Mass Update Groups tool updates group membership for the students in the list you have selected or filtered.
Before opening the bulk group tool, first use the filters on the Manage Enrollment page to display the students you want to change.
For example, you might display:
- all 8th-grade students;
- all students currently assigned to a particular group;
- students in a particular grade, instrument, or program; or
- any other filtered list of students.
- HINT: Use CTRL-CLICK to select students individually
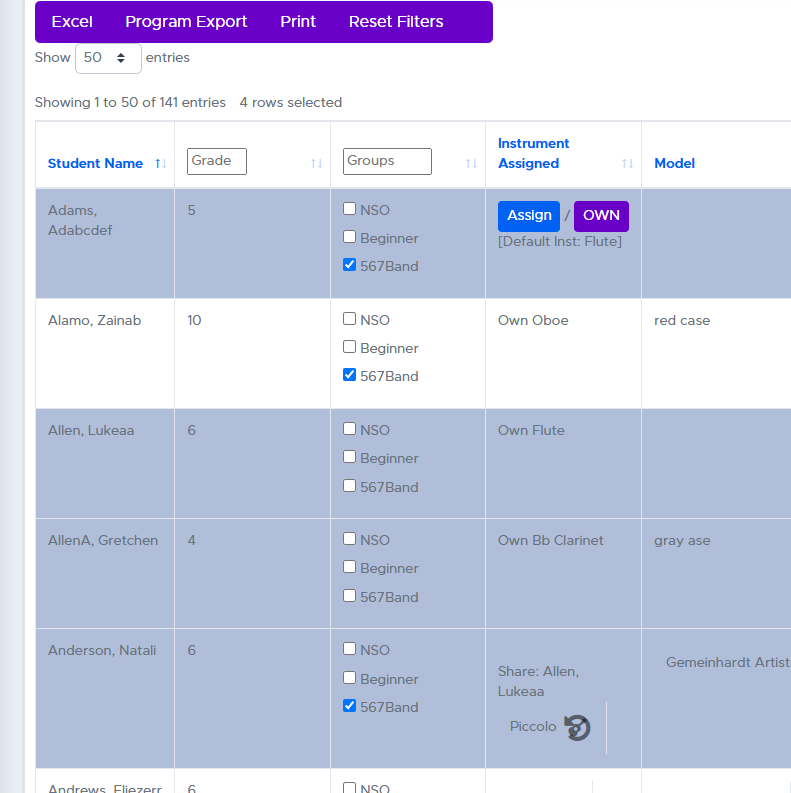
Once the correct students are displayed:
- Click the orange Settings button.
- Open Mass Update Groups.
- Locate the group or groups you want to change.
- Choose the appropriate action for each group.
- Leave groups that you do not want to modify set to Do Not Change These Group Assignments.
- Review your selections and confirm the update.
Mass Update Options #
For each group, you can choose one of the following:
Enroll All Selected
Adds every student in your selected or filtered student list to that group.
Unenroll All Selected
Removes every student in your selected or filtered student list from that group.
Do Not Change These Group Assignments
Leaves each student’s existing membership in that group unchanged.
Unless you specifically want to change a group, leave it set to Do Not Change These Group Assignments.
Deleting or Hiding an Old Group #
A group can only be deleted when no students anywhere in the district are enrolled in that group.
If students are still enrolled in the group, the enrollment count shown in Group Settings will prevent the group from being deleted.
Remove All of Your Students From the Group #
To remove all of the students in your program from an old group:
- Return to the Manage Enrollment page.
- Click the group’s Subgroup Shortcut so only students in that group are displayed.
- Click the orange Settings button.
- Open Mass Update Groups.
- Find the group and choose Unenroll All Selected.
- Leave all other groups set to Do Not Change These Group Assignments.
- Confirm the update.
This removes all of the currently displayed students from that group.
Why Does the Group Still Show Students Enrolled? #
Group enrollment counts are district-wide.
If you have removed all of your students but Group Settings still shows students enrolled, students in another building or program within your district are still assigned to that group.
The group cannot be deleted until the district-wide enrollment count reaches 0.
Don’t Need to See the Group Anymore? #
You do not have to delete a group simply because you are no longer using it.
After removing your students from the group, return to Group Settings and uncheck that group so it is no longer displayed in your list of Subgroup Shortcuts.
This is especially useful when another building or program in your district is still using the group.
Common Examples #
Put All 8th Graders in 8th Grade Band #
You do not need to assign each student individually.
- On the Manage Enrollment page, filter the student list to display your 8th-grade students. (Type the number 8 in the grade column)
- Verify that the list contains the students you want to update.
- Click the orange Settings button.
- Open Mass Update Groups.
- Find 8th Grade Band.
- Choose Enroll All Selected.
- Leave all other groups set to Do Not Change These Group Assignments unless you also want to change them.
- Confirm the update.
All of the selected 8th-grade students will be added to 8th Grade Band.
Remove All Students From a Group #
To remove all of your students from a group:
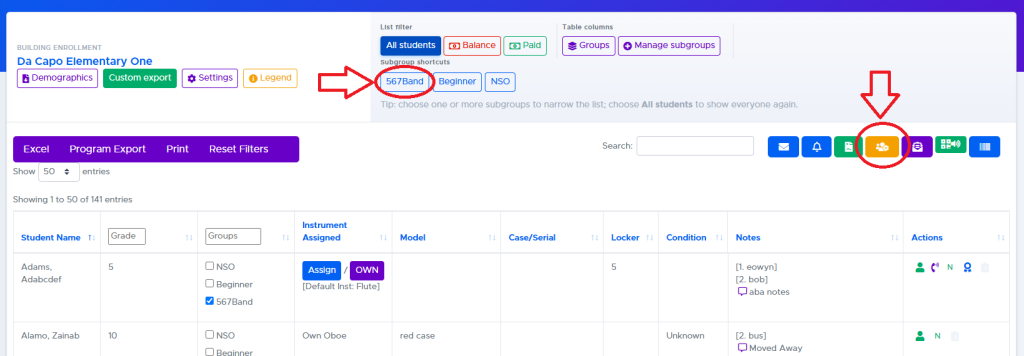
- On the Manage Enrollment page, click the group’s Subgroup Shortcut at the top of the page.
For example, click 567Band. - The student list below will now display only the students enrolled in that group.
- Click the orange Mass Group Update button.
- Find the group you are removing students from.
- Select Unenroll All Selected for that group.
- Leave all other groups set to Do Not Change These Group Assignments.
- Confirm the update.
All of the students currently displayed in the filtered list will be removed from that group.
Important: Always select the group from the Subgroup Shortcuts first. This ensures that only students currently enrolled in that group are included in the bulk update.
After your students have been removed, you can return to Group Settings. If no students anywhere in the district remain enrolled in the group, the group can be deleted. If other students in the district are still enrolled, you can uncheck the group so it no longer appears in your Subgroup Shortcuts.
Move Students From One Group to Another #
You can remove students from one group and add them to another during the same bulk update.
- Display the students you want to move.
- Click the orange Settings button.
- Open Mass Update Groups.
- For the old group, choose Unenroll All Selected.
- For the new group, choose Enroll All Selected.
- Leave all unrelated groups set to Do Not Change These Group Assignments.
- Confirm the update.
This removes the selected students from the old group and enrolls them in the new group at the same time.
Deleting an Old Group #
A group cannot be deleted while students are still enrolled in it.
If Group Settings shows that students are still assigned to a group, first remove those students from the group using Mass Update Groups.
How Do I Find the Students Who Are Still in a Group? #
Start by returning to the Manage Enrollment page and selecting the appropriate group from the Subgroup Shortcuts. You can also click Groups under Table Columns to display group assignments in the student table.
Once you have located the students:
- Display the students who are still assigned to the group.
- Click the orange Settings button.
- Open Mass Update Groups.
- Select Unenroll All Selected for the group you are trying to empty.
- Leave the other groups set to Do Not Change These Group Assignments.
- Confirm the update.
It Still Says Students Are Enrolled in the Group #
The enrollment number shown in Group Settings may represent students assigned to that group throughout the district, not just the students currently visible in your building or program.
If you have removed all of the students you can see but the group still shows an enrollment count, there may be students elsewhere in the district who are still assigned to that group.
Do not delete or change unrelated group assignments while troubleshooting. Leave all other groups set to Do Not Change These Group Assignments.
Once the group’s enrollment count reaches 0, the group can be deleted.
Frequently Asked Questions #
Is there a way to put all of my 8th graders into 8th Grade Band? #
Yes. Filter the Manage Enrollment list to show your 8th-grade students, click the orange Settings button, open Mass Update Groups, and select Enroll All Selected for 8th Grade Band.
You do not need to update the students one at a time.
Can a student belong to more than one group? #
Yes. Groups are independent of one another, so a student can belong to multiple groups when appropriate.
For example, a student could be enrolled in both 8th Grade Band and NYSSMA.
Will Enroll All Selected remove students from their other groups? #
No. Selecting Enroll All Selected for one group changes that group’s membership only.
Leave the other groups set to Do Not Change These Group Assignments if you want their existing assignments to remain unchanged.
Can I add students to one group and remove them from another at the same time? #
Yes. Choose Unenroll All Selected for the old group and Enroll All Selected for the new group before confirming the update.
Why can’t I delete a group? #
A group cannot be deleted while students are still assigned to it. Remove the remaining students from the group first. Once the enrollment count reaches 0, the group can be deleted.
Why does Group Settings still show students enrolled after I removed everyone I can find? #
The number shown in Group Settings may include students elsewhere in the district. The group must have no remaining student assignments before it can be deleted.